Creating a tracker
This section explains the steps for creating a tracker and getting the tracking URL. It is used in advertising campaigns to track installations and app openings.
- Step 1. Fill in the campaign details
- Step 2. Configure a SmartLink
- Step 3. (Optional) Configure attribution
- Step 4. (Optional) Configure postbacks
- Step 5. Save changes and test the tracker
- Step 6. Use the created tracking link
Step 1. Fill in the campaign details
In the AppMetrica interface, go to Trackers.

- In the top-left corner, click Create a tracker.
- In the Campaign details block fill in all fields:
- This is remarketing campaign — Flag indicating that the tracker is being created for a remarketing campaign.
For more information, see Creating a remarketing tracker.
- Tracker name — A name for the tracker. After being created, the tracker is available in the list with the specified name.
- Application — The application the tracker is being created for.
- Partner — The media source to attribute clicks, installs, and conversions to.
If the media source isn't in the list, you can add it. After being added, the new source will be saved in the list.
Note. Once the tracker has been created, you can't change the media source in the settings.
Step 2. Configure a SmartLink
A SmartLink is a universal tracking URL that automatically changes the destination URL, deeplink, and post-click landing depending on the app store.
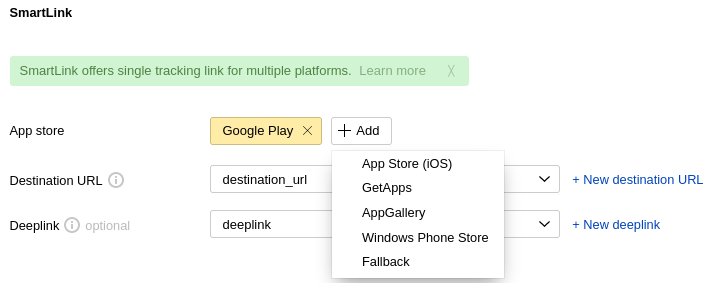
Available fields:
App store: Google Play, App Store (iOS), GetApps, AppGallery, Windows Phone Store, or Fallback. The destination URL will lead to the selected app store.
DetailsGetApps. If GetApps and other stores are specified as the app store and GetApps is not installed on the Xiaomi device, the user will not be redirected to any other app store.
AppGallery. If AppGallery and other stores are specified as the app store and AppGallery is not installed on the Huawei device, the user will be redirected to the web version of this store.
Google Play. If only Google Play is specified as the app store, a user with a Xiaomi or Huawei device will be directed to Google Play.
Use Fallback to create a destination URL for all other types of traffic. For example, you could send the user to a promo page if they clicked on the link from a desktop PC (or another non-mobile device).
Note. You can only select Fallback. Then all users are sent to the specified destination link.- Destination URL: A link that leads to an app in the app store or a page where the user can install the app. For GetApps, a deeplink is specified.
- Deeplink: A link in the myapp://some_data format which can be used to send data to the application. When the user clicks on it, the app opens, if it is already installed.
To track app openings via deeplink, configure your app to support them (Android | iOS).
Tip. Use Universal Links as deeplinks on iOS. To work with Universal Links, configure them in your application. - Post-click landing — The page that is opened in the user's browser after clicking the link to install the app. By default, this is an empty page for the tracker's last redirect.Attention. The post-click landing option is no longer supported.
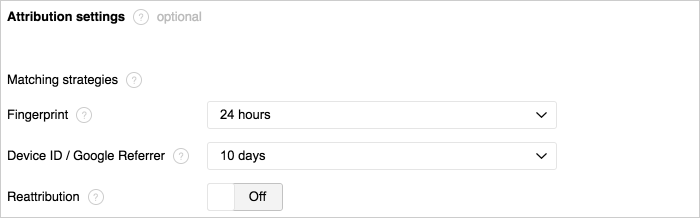
Step 3. (Optional) Configure attribution
Attribution correctly detects the source that attracted users to your app and accurately correlates an app install with an ad interaction: a click or impression.
For more information about attribution methods, see AppMetrica tracking technology and Impression attribution.
- Fingerprint — Time interval of attribution (the time between the click and first start). AppMetrica uses it for the Device Fingerprint Matching attribution. The default value is 24 hours.
Acceptable values are from 1 to 24 hours.
- Device ID / Google Referrer — Time interval of attribution, that is used for the Device Identifier Matching attribution. The default value is 10 days.
Acceptable values are from 1 to 10 days.
- Reattribution — Attribution of reinstalls by pre-existing users. This option is disabled by default. For more information, see Attributing app installs.Note. For test devices, reattribution is always enabled (regardless of the option status). For more information about adding test devices, see Testing attribution.
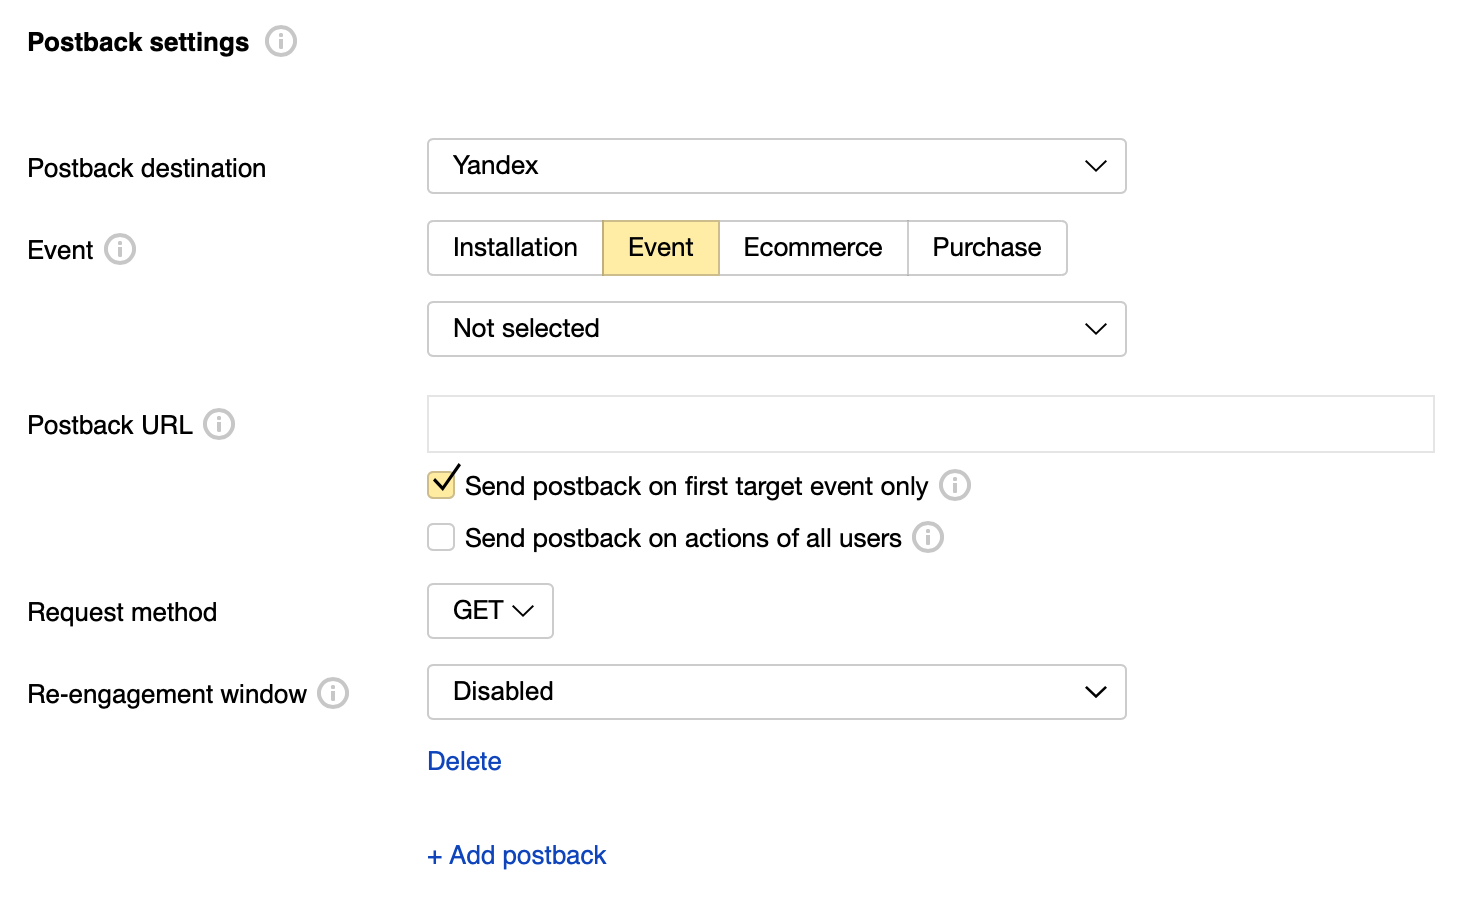
Step 4. (Optional) Configure postbacks
Postbacks are usually necessary when running CPI/CPA campaigns. You can add up to 5 postbacks per tracker.
- Postback destination — The partner who will receive the postback.
If you want to collect your own statistics, you can send the postback to your own server. To do this, add a media source.
- Event — The target event that triggers sending the postback to the media source.
The event may have one of several types:
- Install postback — Send the postback after an attributed install.
- Event postback — Send the postback after an attributed conversion.
Postback URL — The postback link. AppMetrica allows transmitting custom tracking parameters to the postback URL. By default, the postback URL contains parameters from the media source settings. To change the parameters, click Edit (changes will be saved in the media source settings).
You can set the corresponding option to send the postback only for the first target event. All subsequent events will be ignored.
Note. Some advertising partners can set a permanent Postback URL for their network. In this case, the postback is sent to the partner regardless of other settings. It can't be edited.- Re-engagement window — The maximum amount of time that can pass between the install and the target event. A postback won't be sent to the media source if the target event takes more than the specified time.
Send postback on actions of all users — Postback will be sent for every app user's target event, regardless of the installation source.
Attention.If you select this option, the attribution source for sending postback is ignored. The partner will receive events from all sources but without attribution parameters.
To send both attributed and unattributed postbacks, create two postbacks: one with the enabled option and the other with the disabled option.
Step 5. Save changes and test the tracker
- Click the Save button at the bottom of the page.
The list of all saved trackers are in the Trackers section. You can edit and archive them. The statistics from archived trackers remain available in reports.
- Test the tracker before launching an advertising campaign. For more information, see Testing a tracker.
Step 6. Use the created tracking link
target= " _blank" attribute when inserting a link into the markup. Some browsers may block the click-through when opening a link in a new window.Don't place the link in the iframe element.
Use the tracking URL in an ad campaign after successful testing. To do this, find the Tracking URL block and copy the link that looks like:
https://redirect.appmetrica.yandex.com/serve/123456appmetrica_js_redirect=0 parameter:https://redirect.appmetrica.yandex.com/serve/123456?appmetrica_js_redirect=0For impression attribution, use the following link:
https://impression.appmetrica.yandex.com/serve/123456